Einsteigerguide zum UV-Mapping: Grundlagen und ein wenig mehr.
Mit diesem Beitrag möchten wir ihnen die Grundlagen des UV-Mappings ein wenig näherbringen. Dabei greifen wir auf die 3D-Software Maya von autodesk zurück.
Nach Wikipedia versteht man unter UV-Mapping „… einen geometrischen Herstellungsprozess zur Herstellung eines 2D-Bildes, welches ein 3D-Modell repräsentiert.“
UV Mapping ist eine Technik zum Auftragen einer 2D-Textur auf ein 3D-Objekt. Dabei bezeichnen U und V die Achsen eines 2D-Bildes, während X, Y und Z als Bezeichnung für 3D modellierte Objekte verwendet werden. Dabei wird ein 2D-Bild um ein 3D-Objekt herumgewickelt. UV-Mapping verteilt Polygone eines 3D-Modells auf eine 2D-Ebene, um die Textur darauf abzubilden.
UV Mapping in Maya.
Maya enthält viele nützliche Funktionen für UV-Mapping-Projektionen wie planare, automatische oder sphärische UVs auf Kamerabasis. Sie können jede der oben genannten Möglichkeiten gemäß ihren Anforderungen nutzen.
Vorschläge fürs UV-Mapping
Bilden Sie jedes Objekt im UV-Raum ab. Sie werden in der Lage sein, Texturen auf jeden Objektbereich anzuwenden.
Stretching gestaltet sich beim UV-Mapping häufig schwierig. Problematisch wird es oft, wenn Polygone anders als ihre tatsächliche Form verlegt werden. Um Ausdehnungen zu vermeiden, sollten Sie ihr Modell mit der Control Map überprüfen. Zudem sollten Sie prüfen, ob die Checkers quadratisch und gleichmäßig verteilt aussehen. Die Qualität des Produkts hängt davon ab, wie gut die UVs platziert sind.
Die Überlappung bedeutet, dass ein UV über ein anderes UV geht. Meistens brauchen Sie am Ende des Prozesses keine Überlappungen mehr, so dass Sie ihre Textur über die gesamte Oberfläche des Modells separat streichen können.
Reduzieren Sie UV-Raum.
Ordnen Sie UVs im Layout an und optimieren Sie so weit wie möglich. Stellen Sie keine großen Zwischenräume zwischen die Objekte. Die Auflösung der Haptik bleibt hoch und sauber, was die Reduzierung des UV-Raums angeht.
Nähte.
Nahtstellen sind die Stellen, an denen Sie ihr 3D-Modell ausschneiden, damit es in 2D ausgepackt werden kann. Im Ergebnis sind wenige Nähte erreichbar, wodurch es leicht wird das Modell zu texturieren.
Tests mit der Checkers Map.
Wenn Sie UVs erzeugen, überprüfen Sie, ob diese gut funktionieren oder nicht. Zum Test des UV-Mapping verwenden Sie am besten die Tillable Checker Map auf ein 3D-Objekt. Der Test auf einer Checker Map ist sehr nützlich, da dieser anzeigt, wo genau eine Korrektur erforderlich ist.
UV Mapping für die Modellierung von Gesichtern.
Auf dem folgenden Bild sehen Sie ein Gesichtsmodell in Maya:
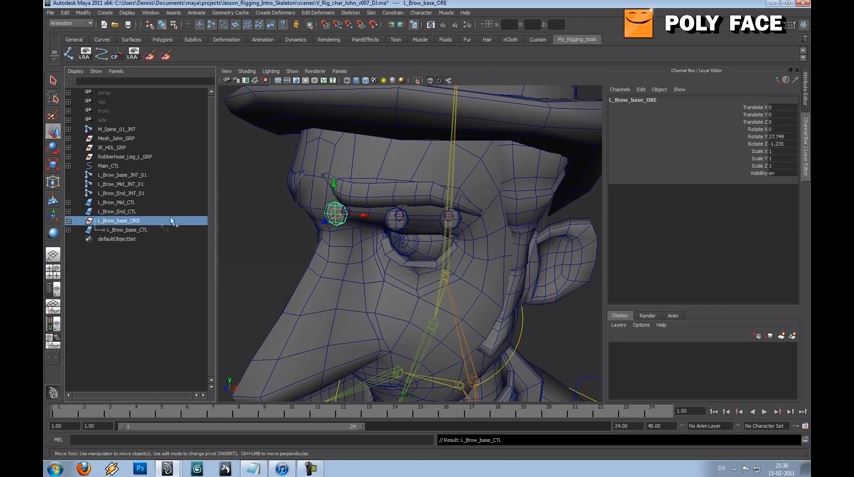
Für das UV-Mapping von Gesichtern folgen Sie den Pfad Create UVs > Planar Projection und anschließend Projektion auf der Z-Achse durchführen.
Im Anschluss müssen Sie die sogenannte „Checker Map Texture“ auf das Gesicht anwenden, damit Sie das aktuelle UV-Layout sehen können.
Im letzten Schritt wählen Sie die Kanten von der Fläche aus.
Um die UVs zu cutten, gehen Sie in einem nächsten Schritt zu Edit > Cut UVs. Wählen Sie anschließend horizontal und vertical und klicken Sie dann auf Übernehmen.
Damit haben Sie nun den Arbeitsprozess des UV-Mappings in Maya kennengelernt.
Wir hoffen, dass Sie diesen Blogbeitrag hilfreich fanden. Wenn noch Fragen offen geblieben sind, können Sie sich gerne per E-Mail an marketing@viscircle.com wenden. Wir werden ihnen so schnell wie möglich antworten.