Wie Sie einen Einstieg in das Parenting in Blender finden.
Wenn Sie ein komplexes Objekt, wie beispielsweise eine Uhr erstellen möchten, können Sie die verschiedenen Teile als separate Objekte modellieren. Alle Teile können jedoch miteinander verbunden werden. In diesen Fällen sollten Sie ein Objekt als übergeordnetes Objekt aller Child-Elemente kennzeichnen. Bewegung, Drehung oder Skalierung des Elternteils wirkt sich auch auf die Child-Elemente aus.

Um übergeordnete Objekte auszuwählen, wählen Sie mindestens zwei Objekte aus und drücken Sie Strg-P. Das Menü „Set Parent to“ erscheint und ermöglicht es ihnen, aus einer von mehreren möglichen verschiedenen Elternformen auszuwählen. Wenn Sie die Auswahl eines der Einträge in „Set Parent to“ bestätigen, wird die Beziehung Child-Element zu Parent bzw. Eltern angelegt.
Das zuletzt ausgewählte Objekt ist das aktive Objekt (hellorange markiert) und auch das übergeordnete Objekt. Wenn Sie vor der Auswahl des übergeordneten Objekts mehrere Objekte ausgewählt haben, sind diese Child-Elemente des übergeordneten Objekts und befinden sich auf der gleichen Ebene der Hierarchie (sie sind „Geschwister“).
Das Popup-Menü „Set Parent To“ ist kostensensitiv, d.h. die Anzahl der angezeigten Einträge kann sich je nachdem ändern, welche Objekte bei Verwendung der Tastenkombination Strg+P ausgewählt werden.
Für den nicht inversen Modus drücken Sie stattdessen Shift-Ctrl-P. Dadurch entsteht eine alternative Parent-Child-Beziehung, bei der Unterobjekte vollständig im Koordinatensystem der Eltern vorhanden sind. Dies ist z.B. für CAD-Zwecke die bessere Wahl.
Das Verschieben, Drehen oder Skalieren des Elternteils wird in der Regel auch das Kind/die Kinder bewegen/drehen/skalieren. Das Verschieben/Drehen/Skalieren des Kindes bzw. der Kinder des Elternteils führt jedoch nicht dazu, dass sich das Elternteil bewegt, dreht oder skaliert. Mit anderen Worten, die Eltern beeinflussen das Kind und nicht die Kinder die Eltern.
Im Allgemeinen können die Unterobjekte bei der Verwendung von Strg-P oder 3D-View Header > Object > Parent to Parent Objects nur ein übergeordnetes Objekt haben. Wenn ein untergeordnetes Objekt bereits ein übergeordnetes Objekt hat und Sie ihm ein anderes übergeordnetes Objekt geben, wird Blender die vorherige übergeordnete Beziehung entfernen.
Blender unterstützt viele verschiedene Arten der Erziehung, die unten aufgelistet sind:
- Objekt
- Bone
- Vertex
- Vertex (Triangle)
SetUps.
Neben dem Parenting der ausgewählten Objekte fügt es den untergeordneten Objekten einen Modifikator oder eine Einschränkung hinzu, wobei der übergeordnete Teil als Zielobjekt dient oder aktiviert eine übergeordnete Eigenschaft, z.B. Follow Path.
- Armature Deform.
- Curve Deform.
- Follow Path.
- Path Constraint.
- Lattice Deform.
Objekt-Parent.
Objekt Parent ist die allgemeinste Form der Elternschaft, die Blender unterstützt. If nimmt ausgewählte Objekte und macht das zuletzt ausgewählte Objekt zum übergeordneten Objekt, während alle anderen ausgewählten Objekte Unterobjekte sind. Die Unterobjekte erben die Transformationen des übergeordneten Objekts. Das übergeordnete Objekt kann von beliebigem Typ sein.
Objekt (Transformieren beibehalten) Parent.
Object (Keep Transform) Parent arbeitet sehr ähnlich wie Object Parent, der Hauptunterschied besteht darin, ob sich die Child Objekte an alle vorherigen Transformationen erinnern, die vom vorherigen Parent Object auf sie angewendet wurden.
Da es schwierig ist, dies auf eine leicht verständliche technische Weise zu erklären, sollten wir stattdessen ein Beispiel verwenden.
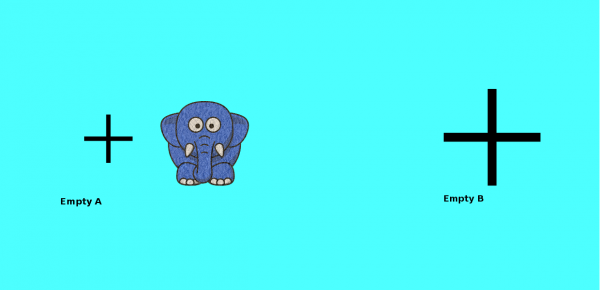
Angenommen, wir haben eine Szene, die aus drei Objekten besteht, nämlich zwei leeren Objekten mit den Namen „EmptyA“ und „EmptyB“ und einem Elefanten. Die folgende Abbildung zeigt die drei Objekte ohne aktive Beziehungen.

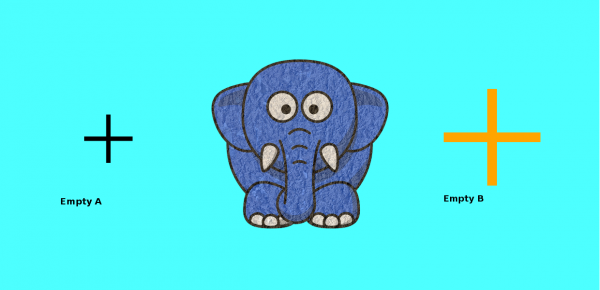
Wenn Sie das Elefanten-Objekt per RMB-Klick auswählen und anschließend Shift-RMB auf „EmptyA“ und Strg-P klicken und schließlich Objekt aus dem Popup-Menü „Set Parent To“ auswählen. Dies führt dazu, dass das „EmptyA“-Objekt das übergeordnete Objekt des Elefanten-Objekts ist. Wenn Sie nur „EmptyA“ ausgewählt haben, wird das Drehen/Skalieren/Bewegen dazu führen, dass das Elefanten-Objekt entsprechend geändert wird.
Skalieren Sie das „EmptyA“-Objekt, so dass der Elefant kleiner wird und sich ein wenig nach links bewegt.

Wenn Sie nur das Elefanten-Objekt per RMB-Klick auswählen und anschließend Shift-RMB auf „EmptyB“ und Strg-P drücken sowie Objekt aus dem Popup-Menü „Set Parent To“ auswählen. Dies führt dazu, dass das „EmptyB“-Objekt das übergeordnete Objekt des Elefanten-Objekts ist. Beachten Sie, dass sich bei einem Wechsel des Elternteils des Elefanten die Größe des Elefanten geändert hat.

Dies geschieht, weil das Elefanten-Objekt nie direkt seine Größe verändert hat, die Veränderung kam zustande, weil es das Kind von „EmptyA“ war, das seine Größe geändert hat. Die Änderung des Elefanten Elternteils auf „EmptyB“ führte dazu, dass diese indirekten Skalenänderungen entfernt wurden, da „EmptyB“ seine Skala nicht verändert hat.
Dies ist oft das erforderliche Verhalten, aber es ist auch manchmal nützlich, dass, wenn Sie ihr Elternobjekt ändern, das Kindobjekt alle früheren Transformationen beibehält, die es vom alten Elternobjekt erhalten hat. Wenn wir stattdessen beim Ändern des Elternobjekts des Elefanten von „EmptyA“ auf „EmptyB“ den Elterntyp Objekt (Keep Transform) gewählt haben, würde der Elefant seine Skaleninformationen behalten, die dieser vom alten Elternteil „EmptyA“ erhält, wenn es dem neuen Elternteil „EmptyB“ zugewiesen wird.
Bone Elternteil.
Bone Parenting ermöglicht es ihnen, ein bestimmtes Bone in einer Armatur zum Elternobjekt eines anderen Objekts zu machen. Das bedeutet, dass sich das Unterobjekt bei der Transformation einer Armatur nur dann bewegt, wenn das spezifische Bone das Unterobjekt der Bewegung ist.
Um Bone Parenting zu verwenden, müssen Sie zuerst alle Unterobjekte auswählen, die Sie einem bestimmten Armature Bone übergeordnet haben möchten, anschließend Shift-RMB das Armature Object auswählen und es in den Pose Mode schalten und anschließend den spezifischen Bone auswählen, den Sie als Parent Bone verwenden möchten, indem Sie ihn auswählen. Drücken Sie anschließend Strg-P und wählen Sie Bone aus dem Popup-Menü Elternteil einstellen aus.
Die Transformation dieses Bones im Pose-Modus führt nun dazu, dass sich auch die Unterobjekte transformieren.
Relative Parenting.
Bone Relative Parenting ist eine Option, die Sie für jeden Bone umschalten können. Dies funktioniert auf die gleiche Weise wie das Bone Parenting mit einem Unterschied.
Mit Bone Parenting, wenn Sie einen Bone zu einigen untergeordneten Objekten erzogen haben und Sie dieses Bone auswählen und in den Bearbeitungsmodus wechseln und anschließend diesen Bone übersetzen. Wenn Sie wieder in den Posenmodus auf diesem Bone wechseln, wird das untergeordnete Objekt, das zu diesem Bone erzogen wird, wieder an der Stelle des Bones im Posenmodus einrasten.
Single Armature Bone, der einen untergeordneten Objektwürfel mit Bone Parenting aufweist.
Bone Relative Parenting funktioniert anders: Wenn Sie einen Parent Bone im Edit Modus verschieben, wenn Sie wieder in den Posenmodus wechseln, werden die untergeordneten Objekte nicht an die neue Position des Posen Bones verschoben.
Vertex Parent.
Für Objekte vom Typ Curve, Surface, Mesh oder Grid besteht die Möglichkeit, einen seiner Eckpunkte oder Punkte als übergeordnetes Objekt zu verwenden. Sie können ein Objekt auch auf einen einzelnen Nodes oder eine Gruppe von drei Nodes überlagern, so dass sich das Kind/die Kinder bewegen, wenn das übergeordnete Mesh verformt wird.
Vertex Parent aus dem Edit Mode.
Wählen Sie im Objektmodus das Kind/die Kinder und anschließend das übergeordnete Objekt aus. Tabulator im Bearbeitungsmodus und auf dem übergeordneten Objekt wählen Sie entweder einen Node, der einen einzelnen Punkt definiert oder drei Nodes, die einen Bereich definieren (die drei Nodes müssen nicht eine komplette Fläche bilden, sie können beliebige drei Nodes des übergeordneten Objekts sein) und drücken Sie anschließend Strg-P und bestätigen.
An diese Stelle, wenn ein einzelner Node ausgewählt wurde, wird eine Beziehungs-/Elternlinie von Node zum Kind/zu den Kindern gezogen. Wenn drei Nodes ausgewählt wurden, wird eine Beziehungs-/Eltern-Linie vom gemittelten Mittelpunkt der drei Punkte (des übergeordneten Objekts) zum Kind bzw. zu den Kindern gezogen. Da sich das übergeordnete Mesh verformt und sich der gewählte übergeordnete Nodes/Vertices bewegt, bewegen sich auch das Kind bzw. die Kinder.
Vertex Parent aus dem Objektmodus.
Das Vertex Parenting kann vom Objektmodus aus durchgeführt werden, dies geschieht wir das normale Objekt Parenting, drücken Sie Strg-P im Objektmodus und wählen Sie Vertex der Vertex (Dreieck).
Die nächstgelegenen Nodes werden von jedem Objekt verwendet, was normalerweise das ist, was Sie wollen.
Das übergeordnete Parent Context Menu bedeutet, dass Benutzer schnell eine große Anzahl von Vertex-Parent-Beziehungen einrichten können und den mühsamen Aufwand vermeiden, jede Vertexbeziehung zwischen Eltern und Kindern separat zu erstellen.
Hinweis: Es ist in der Tat eine Art „umgekehrter“ Haken.
Optionen.
Child- bzw. Kindelement bewegen.
Sie können ein untergeordnetes Objekt auf sein übergeordnetes Objekt verschieben, indem Sie seinen Ursprung löschen. Die Beziehung zwischen Eltern und Kind bleibt davon unberührt. Wählen Sie das untergeordnete Objekt aus und drücken Sie Alt-O. Durch die Bestätigung wird das untergeordnete Objekt an der Position des übergeordneten Objekts eingerastet. Verwenden Sie die Ansicht Outliner, um sicherzustellen, dass das untergeordnete Objekt noch übergeordnet ist.
Elternteil löschen.
Sie können eine Eltern-Kind-Beziehung über Alt-P entfernen.
Elternteil löschen.
Wenn das übergeordnete Element in der Gruppe ausgewählt ist, müssen Sie nichts machen. Wenn ein Kind oder mehrere Kinder ausgewählt werden, werden sie vom Elternteil getrennt oder freigegeben und sie kehren zu ihrer ursprünglichen Position, Drehung und Größe zurück.
Klarheit und Aufrechterhaltung der Transformation.
Löscht die Kinder vom übergeordneten Element und behält die Position, Drehung und Größe, die ihnen vom übergeordneten Element zugewiesen wurde.
Übergeordnete Elternteile löschen.
Platziert die Kinder in Bezug auf das Elternteil, als wären sie in der globalen Referenz platziert. Dadurch wird die Transformation der Eltern von den Kindern effektiv aufgehoben. Die hierarchischen Beziehungen werden nicht entfernt, sondern die korrigierende Matrix wird von den ausgewählten Objekten aus gelöscht.
Wenn beispielsweise das übergeordnete Element um 10 Einheiten entlang der X-Achse bewegt wird und Clear Parent Inverse aufgerufen wird, werden alle ausgewählten Kinder freigegeben und bewegt – 10 Einheiten zurück entlang der X-Achse. Die „Inverse“ verwendet nur die letzte Transformation, wenn das Elternteil sich zweimal, jeweils 10 Einheiten für insgesamt 20 Einheiten bewegt, dann bewegt die „Inverse“ das Kind nur 10 Einheiten zurück und nicht 20.
Tipps & Tricks.
Es gibt eine weitere Möglichkeit, die Eltern-Kind-Beziehung in Gruppen zu sehen, nämlich die Outliner-Ansicht des Outliner-Editors.
Bekannte Einschränkungen.
Ungleiche Skala.
Ein Elternteil mit ungleichmäßiger Skala und Drehung in Bezug auf sein Kind kann einen Shear-Effekt verursachen.
Während dies durch Parenting unterstützt wird, geht die Schere verloren, wenn der Parent gelöscht wird, da sie nicht durch Position, Skalierung und Rotation dargestellt werden kann.
Wenn „Clear“ und „Keep Transformations“ das Objekt bewegt, ist eine ungleichmäßige Skalierung die häufigste Ursache.
Vielen Dank für ihren Besuch.


